Thursday, May 26, 2016

Waffles As Yummylicious Dessert and Wholesome Meals

The mere mention of 'Waffles' conjure many images of a cooked, leavened square or round piece of dough with various patterns and flavour. They are typically served as a sweet dessert or snack and for the American version, it is typically expected to be served with ice cream, cream and a sweet syrup.

For us locals, it is common to find many bakeries serving a green coloured version, the pandan waffles, with assortment of jams to choose to go with it. The fact that there is no shortage of queuing customers in front of these stalls at any time of the day, is a testimony of how much we love them!

Personally, I love them too and had done a post titled "Waffles" back in 2011. At that time, I didn't have my own waffle maker and had to borrow one. I bought one eventually one and a half years ago but didn't get down to using it till recently. Once I start using it, I have never had enough of making waffles, both as dessert and as savory wholesome meals!
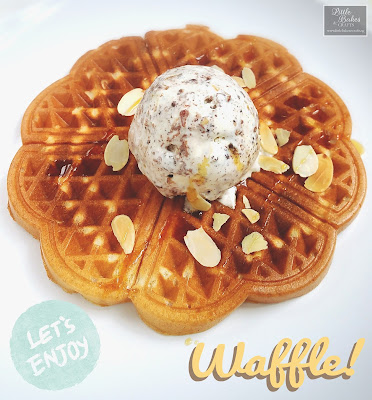
Old Fashioned Waffle - Love this, with ice cream and a drizzle of maple syrup.
Can never get enough of this!

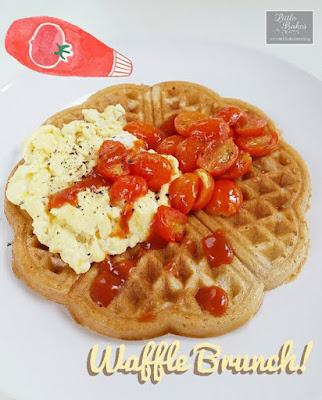
Waffle Brunch - If you only had waffle as dessert, think again!
By pairing it with scrambled eggs, sautéed tomatoes and a dash of ketchup,
they make wonderful delicious and wholesome meals. Have it for breakfast with a cup of juice, served it with a salad for lunch or simply as it is for a light and easy dinner.

Here's my recipe to share and inspire you. You can make a bigger batch and store in airtight containers in the fridge, ready for a quick and easy snack or meal anytime. I keep mine for up to 3 days. If  you prefer to make fresh, it's not that difficult, except perhaps whipping up the egg white.

Waffle Recipe
Ingredients (Makes 4 pcs of 7in x ¾in round waffle)
- Plain flour  1 cup
- Corn Flour  1.5 tbsp
- Baking Powder  1.5 tsp
- Baking Soda  ¼ tsp
- Salt  0.5 tsp
- Cinnamon Powder  0.5 tsp or 1 tsp, depending on persoanl preference
- Sunflower Oil or Melted Butter  2 tbsp
- Milk  1 cup
- Vanilla Extract  1 tsp
- Egg Yolk 1 no.
- Egg White  1 no.
- Sugar  1.5 tbsp

Steps:
1. Sieve all dry ingredients, except for sugar, into a bowl
2. Mix egg yolk, oil (or melted butter) and milk into the flour mixture, using a hand whisk till mixture is smooth with no lumps
3. Whisk  egg white with sugar till stiff peak form, using either a hand whisk or handheld electric mixer and fold into the batter in 2 or 3 batches
4. Let batter rest for 30 mins in the fridge, before portioning and cooking in your waffle iron. As a rule of thumb, I set mine to high temperature and cook till there's hardly any steam coming out from the side of the waffle iron.
5. Transfer waffle to a rack (so that steam does not get trapped on the underside of the waffle and make it soggy!) while you finished preparing your accompaniment such as ice cream, tomatoes or eggs. Plate as per your preference and serve!

Enjoy!

Note: For Pandan Waffle, replace the following ingredients:
- milk to coconut milk
- vanilla extract to 2 tsp of pandan essence (optional)
- cinnamon powder to 1 tbsp of thick pandan juice (you may blend a small bunch of pandan leaves with the coconut milk, let it steep for half an hour before sieving with a fine sieve to remove the shredded leaves; the steeping will help to draw out the natural green colouring from the leaves)


P.S: I had bought my waffle maker as it was a good brand at a discounted price. However, in my excitement, I failed to notice the waffle plates are not deep enough to make thick waffles. If you prefer those thicker waffle with deeper impression, you may want to take note of this when shopping for your waffle maker, that is, if you have not buy yours yet.

Wednesday, September 2, 2015

A New Milestone and New Chapter

The year 2015 is a time of big change and new milestone for me, both on a personal and work level. The latter also brought changes to what I have been doing on this blog, which I had not done any posting for the last 1.5 years!

A year ago, I gave myself a shot at doing a university degree, enrolling myself into varsity at the age of 42. It was a much deliberated, time consuming decision making and preparation process. In my younger days, I didn't pursue one as I couldn't afford it financially and my very limited academic ability has put a hold for me. But due to a career bottleneck, I decided it was worth the effort, and money to try. Well, to cut the story short, I quit the course 7 months later, in addition to quitting my job!

Through the whole compelling episode, what has been buried deep in my heart came to light, baking and sharing this skill and knowledge is still what I love doing best. The though of embarking this passion as a full time career has been a tug of war game  for me over the last 5 years, to go or not to go for it. I am glad I have taken the courage to finally embark on this, a new milestone and a new chapter.

For those of you who are not aware, I started Little Bake Shop back in 2009 while still during my culinary training. It is now officially known as Little Bakes & Crafts. After 6 months of preparations and working through countless nights (while sleeping in the days!), I am proud to have launched my website. I am very thankful and blessed to have understanding and supportive family members. And friends who have helped and given much encouragement, in one way or another. From here on, a whole lot more efforts will be needed to ensure my success. 加油!


Little Bakes & Crafts web launch


Tuesday, February 25, 2014

Pulut Hitam Chiffon Cake

I had been wanting to try pandan chiffon for a long time, since my last chiffon cake blog 2.5yrs ago, but alas, the need to grind fresh pandan leaves doesn't allow me to do so. This pulut hitam cake is the closest I can get to and it wasn't even planned.

Last Saturday, I helped my elder brother prepared 4kg of cooked pulut hitam dessert for his hosting and I kept about 0.5kg for a mouse cake I had intended to bake. A belated birthday cake for our younger brother. However, the plan was for us to do a picnic with some long time friends on Sunday and I decided against it as chiffon cake keeps better at the picnic ground, bearing in mind the kind of weather we have here in Singapore!

The recipe is similar to pandan chiffon, except for 200g of cooked pulut hitam which I had grind together with the coconut cream and mixed into the yolk & flour mixture. The oil was reduced by half for my recipe, as the cream has a high fat content. Another online blogger baker grind the rice into powder and mixed that with the flour. This should be similar to the sesame chiffon cake I used to bake. I was somewhat expecting the cake colour to be some faint traces of purple, but it wasn't. It looks very much like the sesame chiffon, except for the faint traces of rice grains embedded in the cake.

I was worried the pulut hitam puree may be too heavy for the cake to rise, but it had risen well.

Love the frangrance and texture of this cake.

The cake turn out really well. It has a nice coconut fragrance with hint of rice, though not distinctly pulut hitam. Texture is soft and moist. I have made a note to add in more pulut hitam puree for my next attempt and compare how that fares.

As it turned out, we didn't get to go for the picnic and the cake was kept in airtight container in the fridge for 2 days. My heart sank when my brother told me my 2 year old nephew didn't quite enjoy pandan cake. Despite his young age, he has gotten quite well know for his discerning taste for food. You can imagine how great my joy when my brother send me a text message the  next morning that my little nephew has asked for serving during his breakfast time!

Sunday, June 9, 2013

Tarts & Quiche

I love tarts and quiche to bits and my deepest memories of the former is when Delifrance first had it's stores in Singapore. Their very attractive fruit tarts are huge (by the standard at that time) and the fruit toppings is ever so generous.

I recently re-visit their stores and find myself no longer yearning for them as I used too. For some reason, they don't look as good as they used to be. I am not sure if my perception has changed or that their standard has indeed dropped. Could be a combination of both I guess, especially with my exposure to those made by high end hotels such as Marina Bay Sands, plus my training in culinary school.

Instead of buying them, more often than not, I baked them on my own. They are not difficult and the sweet and savoury type can share the same tart base if you want to save time from baking two versions. There are also ready baked tart shells from specialty stores which one can make big batches for parties in a jiffy.

Chocolate tart variations created for Candlenut Kitchen
Fruit tarts with chocolate mousse filling

Savoury tarts - Quiche with salad as a complete meal

I love the sweet version as desserts while the savoury ones as a quick meals served with a salad. My recent picture posting on Facebook have prompted friends asking for tarts making class and I am very happy that I have two classes lined up for this month. I am so looking forward to the fun and rewarding sessions with the participants!

For those reading this post and are keen in the workshop, the details is at:

ST Classified:
http://www.stclassifieds.sg/sell/cooking-and-baking-lessons/courses/tarts-making-class/ad-889995

and my FB:
https://www.facebook.com/lynn.lim.395?ref=tn_tnmn#!/littlebakeshop


Saturday, March 30, 2013

Spaghetti in Cream Sauce with Pan-grilled Fish

I have been posting pictures of my cooking on Facebook for some time. It started out as sharing ideas with a dear colleague to encourage her to do more home cooking for her 2 young daughters rather than her frequent buying take-outs. As months passed, I got hooked on doing the series, which I called it "Tonight's  Dinner" and it became a habit to take extra effort to plate and take photo of my home cooked meals.

Last night's posting received 2 requests from friends asking me to teach them cook that particular dish. All thanks to the attractive photo as I have recently started using online photo applications such as Snapee :). This encouraged me to add on a meal section in this blog.

So friends, here is the cooking instructions as per your requests:


Spaghetti in Cream Sauce with Pan-grilled Fish

Ingredients:
- Spaghetti
- Plain Flour
- Salt
- Black Pepper
- Canola or Light Olive Oil
- Garlic, sliced
- Milk, heated
- Herbs (Thyme & Oregano)
- Sundried Tomatoes and/or cherry tomatoes, cut in small pieces or halves
- White fish or any seafood such as prawns, squid or clams

Steps:

  1.  Season fish or seafood with salt, black pepper and thyme.
  2.  Cook spaghetti in boiling water with added salt. Drain away hot water when done.  Rinse spaghetti under cool running water, drain and mix in some oil. Set aside.
  3.  In a heavy saucepan, heat up small amount of oil and pan grilled/fry the fish or seafood. Set aside when cooked.
  4. Heat up clean heavy saucepan with 2 tbsp of oil. When oil is hot, put in the sliced garlic and fry till lightly brown. Stir in 2 tbsp of flour and cook, stirring constantly, until the paste or roux cooks and bubbles a bit, but don't let it brown — about 2 minutes. Adjust heat if necessary.
  5. Add 1 cup/250ml of hot milk, continuing to stir as the sauce thickens. Bring it to a boil. Add salt, pepper and oregano to taste. Lower the heat, add in the cooked spaghetti, tomatoes and cook, stirring for 2 to 3 minutes more.
  6. Remove from heat and do plating. Topped with cooked fish or seafood, garnish and serve.

Note: For each serving, 2 tbsp of oil and 2 tbsp of flour per cup of milk. You may replace cooking the sauce with half cup of cream and water and thicken with starch thickener.